Before your first power-on
Place the stand build on a stable surface with unobstructed cooling. Confirm the power equipment matches the supplied unit and your regional mains plug. Plug shape alone does not establish a power supply’s voltage, current rating or connector compatibility.
Have your Wi-Fi credentials and chosen pool’s setup instructions ready. Use your own wallet’s Bitcoin receiving address for mining payouts. The store checkout address is only for paying for the miner and must not be used as your personal payout destination.
Connect the miner to Wi-Fi
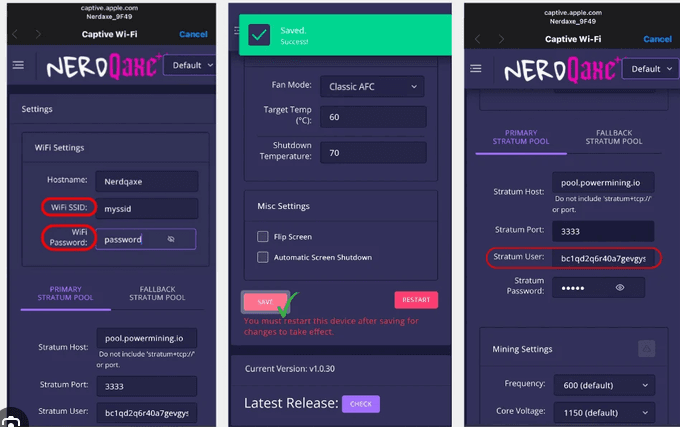
Use the connection details shown by your device or supplied instructions to open its setup interface. Screen names and the exact connection address vary by installed build. If a phone abandons the miner’s setup Wi-Fi because it has no internet, reconnect to that network while you complete configuration.
Enter your home network credentials and save them using the installed interface’s controls. Follow any restart prompt. Once the miner joins home Wi-Fi, reconnect your phone or computer to that same network and find the miner’s current local address.
- Connect using the miner’s displayed setup details.
- Open its setup interface.
- Enter the correct Wi-Fi network and password.
- Save and follow any restart instructions.
- Rejoin your home network and open the miner’s new local IP.
Enter the mining-pool settings
Copy the pool’s connection values exactly. The hostname, port and username have different roles. Use the password and worker-name format specified by that pool; do not assume an example from a different service will work.
| Setting | Purpose | Where to get it |
|---|---|---|
| Pool host | The service receiving mining work | Pool setup documentation |
| Pool port | The pool’s connection endpoint | Pool setup documentation |
| Username / payout | Your payout identity and optional worker label | Your wallet plus pool-specific format |
| Password | The pool’s expected password field | Pool instructions |
| Fallback pool, if supported | A secondary connection | Compatible fallback service documentation |
Check operation before tuning
After saving, let the miner establish its connection and build an average. Check whether the dashboard reports accepted work, stable uptime and reasonable cooling behavior for the supplied configuration. Short fluctuations immediately after startup are not a reliable performance benchmark.
If work is not accepted, check pool values and network connectivity before increasing frequency or voltage. Record your installed version, current settings and errors so support can work from evidence. Ask for help if the unit repeatedly restarts or the required power configuration is unclear.
Common questions
Does NerdQaxe need a laptop connected all the time?
A browser is used to configure and inspect the supplied standalone miner. Normal configuration does not make the laptop its mining processor; ongoing operation depends on the miner’s power and network connection.
What should I change if the miner has no accepted work?
First check the current network connection and the pool’s host, port and username format. Do not treat missing accepted work as a reason to raise voltage or frequency.
Sources and further reading
Use the linked project documentation for release-specific details. The upstream projects and this store are separate; compatibility depends on the exact supplied board and installed build.